Incorporate Users into the ARM from a File Repository
Operators can incorporate users into the ARM from a File Repository.
Operators can also incorporate users from the Active Directories (LDAP users) or local users, where all users not sourced and synchronized with any Active Directory are automatically considered to be local ARM users regardless if they're added to the ARM database using the ARM GUI or using the REST API based script from the customer’s file or database.
File Repository is a valid source of ARM users information for loading and managing of ARM users from an external customer’s CSV files.
|
➢
|
To incorporate users into the ARM from File Repository: |
|
1.
|
Open the File Repository page (Users > File Repository). |

|
2.
|
In this page you can Add, Edit, Delete or Refresh a File Repository for ARM users. The principle of managing File Repository is similar to that of LDAP server. ARM allows a flexible CSV file format in terms of fields / properties, and provides capability to map it to the previously defined ARM users dictionary. When managing users with File Repository, you must choose the unique field of the user (usually, ‘Name’) for unique identification of a user within the File Repository. ARM supports incrementally adding users to an existing File Repository (using the edit feature). |
|
➢
|
To add a new File Repository: |
|
1.
|
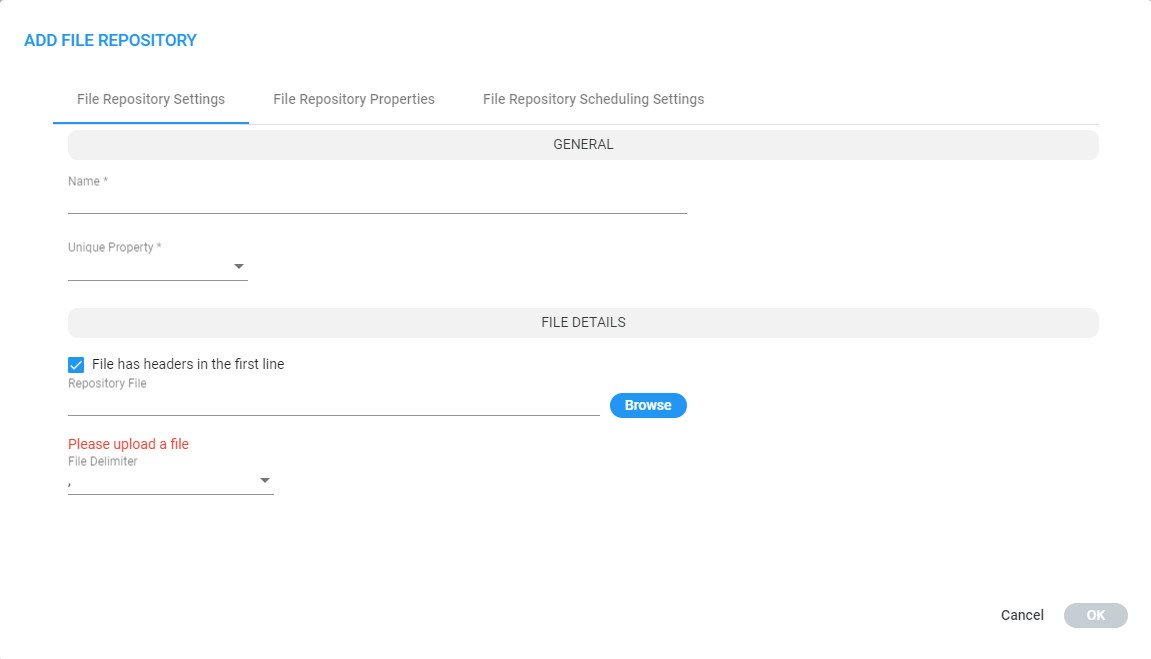
In the File Repository page, click the add + icon. |
|
2.
|
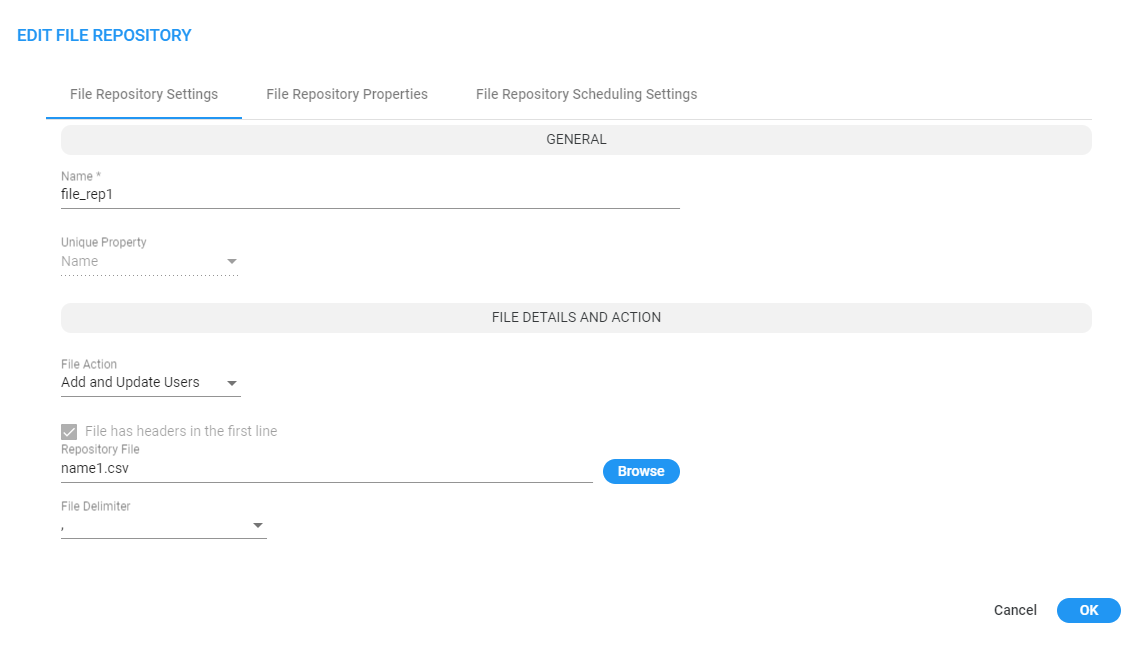
Configure the File Repository Settings screen as follows: |
|
●
|
Name. Mandatory identification of the File Repository within the ARM. |
|
●
|
Unique Property. One of the properties of the users dictionary defined in the ARM which can be treated as unique and can be seen as key for a user sourced by a specific Repository. Note that the ARM software validates this field uniqueness and will not allow duplicated entries. When adding a new File Repository, the operator is allowed to choose one of the user dictionary attributes to be treated as a unique property. Typically, the 'Name' setting is used. |
|
●
|
Field delimiter. The delimiter used in the source CSV (can be ‘,’, ‘;’ or ‘|’). |
|
●
|
File has headers in the first line. |
|
◆
|
If the CSV file has headers in the first line, check (select) this option. In this case, the first line will be taken so you can map the attributes by the column names as defined in the first line of the file. |
|
◆
|
If the CSV file does not have headers in the first line, clear (deselect) this option. In this case, you can map the properties by the columns location - 'column 1', 'column 2'. |
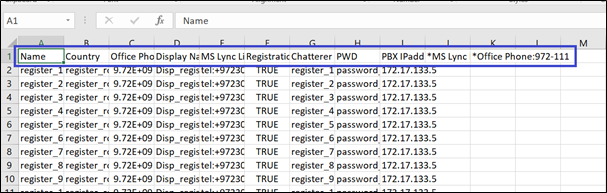
It is highly recommended to have headers in the first line of the CSV file; it will be easier for you to map the properties by the headers as defined in the first line.
Following is an example of a CSV file with defined headers in the first line. These column names will be used by the ARM to map information to the ARM-defined Property Dictionary.
CSV file with defined headers in the first line
|
●
|
Upload file. Allows you to upload the CSV file from the local file system. |
|
●
|
The CSV file must not exceed 1 GB in size. |
|
●
|
Only upload files with UTF-8 encoding; uploading files which are not encoded in UTF-8 is possible but it is not advised as the mapping of the file might be faulty. |
|
3.
|
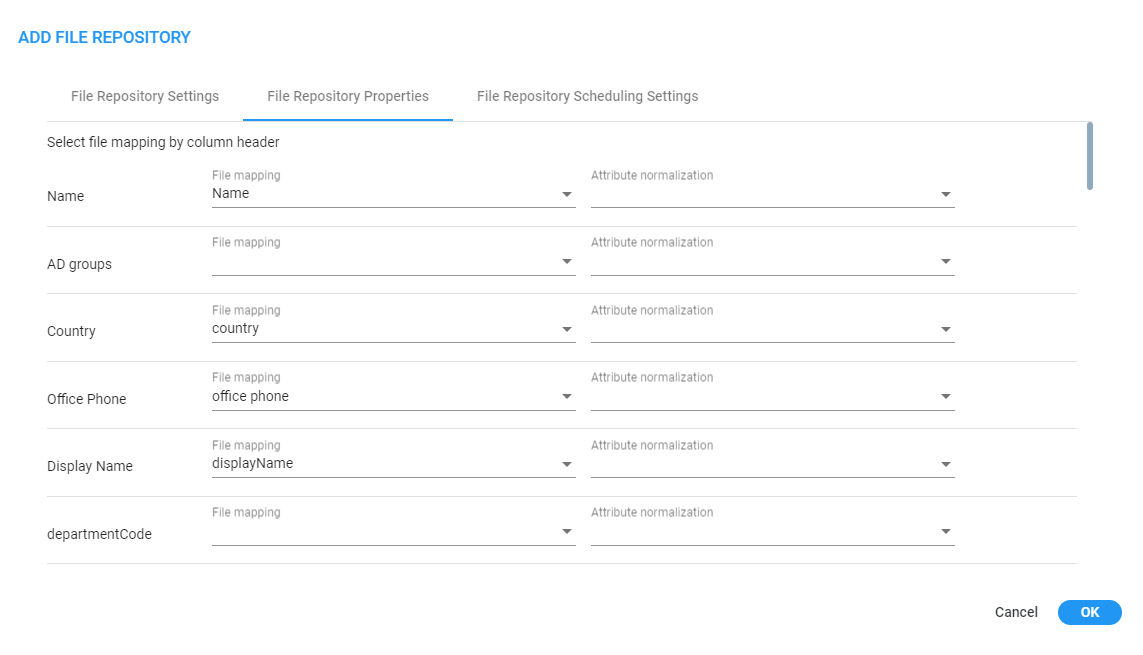
Configure the 'File Repository Properties' screen (similar to the parallel tab of LDAP Properties mapping) as follows: |
|
●
|
Property. Name and all the other properties of the ARM users dictionary. |
|
●
|
File Mapping. Mapping from the CSV file of the File Repository. |
|
◆
|
If the option File has headers in the first line is checked, the file mapping options will be taken from the header line of the CSV file. |
|
◆
|
If the option File has headers in the first line is unchecked, the file mapping options will be column 1 , column 2, etc., meaning that property mapping options will be by the location of the property in each line in the file. |
|
●
|
Attribute Normalization. Information taken from the File Repository can be normalized using predefined Normalization Groups. The original values are saved in the database and are normalized when used (displayed in the GUI, sent to Routers for a routing match, etc.). This is done in the same manner as for information taken from Active Directory. |
|
4.
|
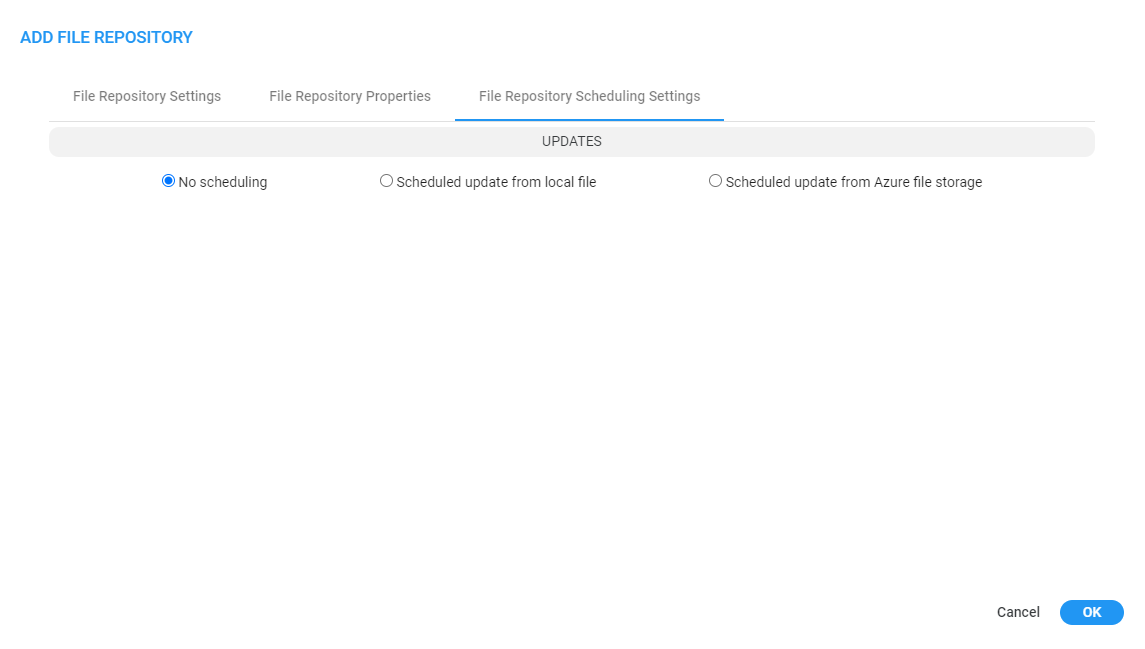
Open the 'File Repository Scheduling Settings' tab (Default: No scheduling). |
|
5.
|
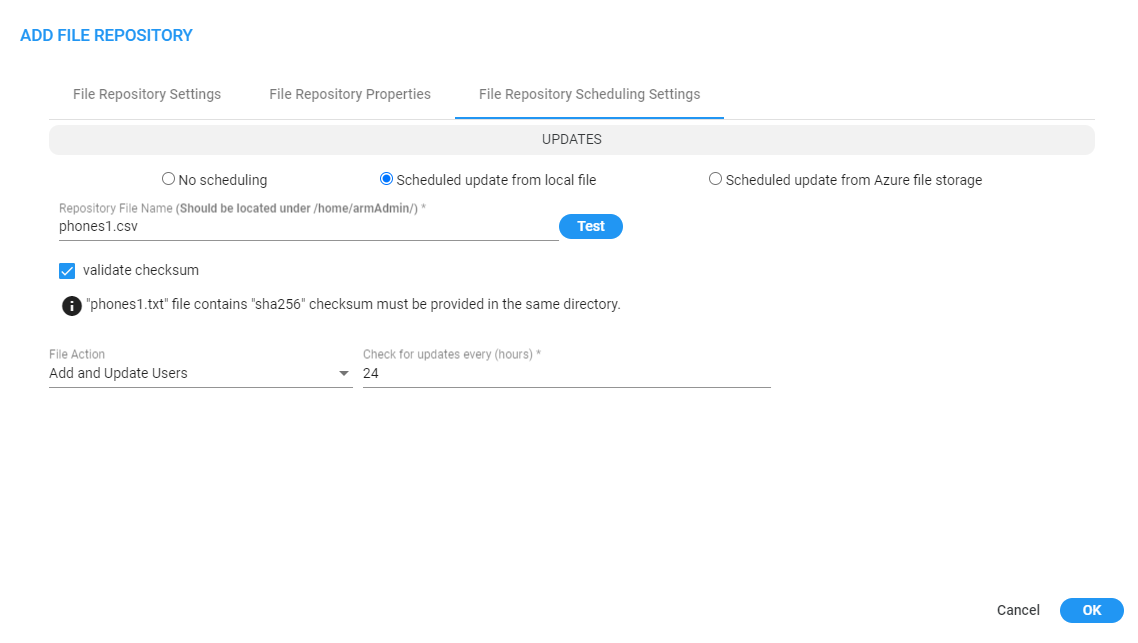
Select the Scheduled update from local file option. Use the figure below and the table below it as reference to configure an update schedule. The option enables scheduling synchronization for the selected File Repository. |
|
6.
|
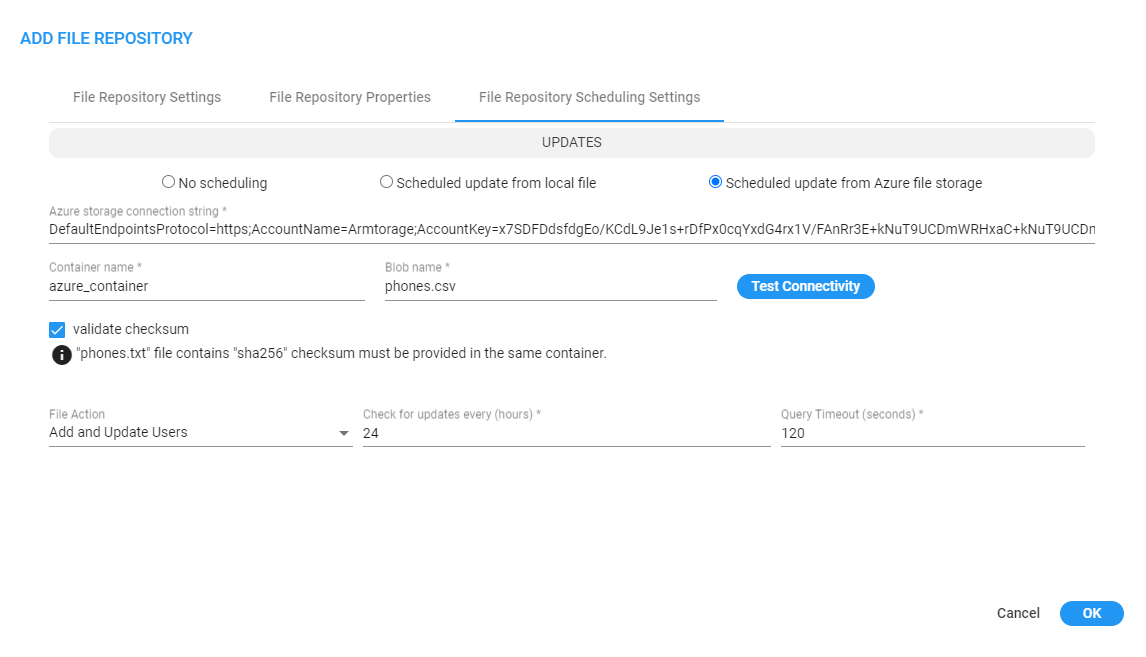
Select the Scheduled update from Azure file storage option. Use the figure below and the table below it as reference to configuring an update schedule. The option enables scheduling synchronization for the selected File Repository.
|
|
■
|
If the 'Validate checksum' option is selected, supply a .txt file with the same name of the Repository File that contains the 'sha256' checksum of the Repository File. For example, two files will be provided to ARM: |
|
●
|
Users.csv (Repository File) |
|
●
|
Users.txt (contains sha256 of the 'Users.csv' file) |
After the sync is completed, the Repository File and the Checksum File (if one exists) are removed from the Azure storage/local machine.
|
■
|
The synchronized file must include the same headers as the initial File Repository. |
Limitations are the same as when manually uploading File Repository, namely:
|
➢
|
To edit a File Repository: |
Editing of the File Repository is typically performed to add/update/delete an incremental bulk of users to/from an existing File Repository. The ARM allows adding a new file with users which will be handled according to initial File Repository definitions and Properties mapping (provided when adding the File Repository). For this reason, operator's aren't allowed to change File Mapping, attribute normalization or the Unique property of the File Repository. The structure of the CSV file and the File Repository is defined by the initial Add action. The configuration that can be changed during the edit are:
|
●
|
Name. Will change the name of File Repository even for existing users who were sourced by that File Repository. |
|
●
|
Delimiter. Delimiter used in the CSV file to be added (can be different from the initial one). |
|
●
|
Upload file. The new file with users to be incrementally added to the existing File Repository. The file name can be different from the initial one. |
Four actions are supported by edit a File Repository:
|
●
|
Add and Update Users – adding new users and updating existing users.
|
|
●
|
Delete Users – deleting existing users. |
|
●
|
Full Sync All Users - adding new users, updating existing users and deleting existing users that are not in the File Repository. |
|
●
|
File Repository Scheduling Settings - can be changed while editing the File Repository. |
|
➢
|
To delete the File Repository: |
Deleting the File Repository causes all users related to it to be deleted. The ARM GUI displays a confirmation prompt indicating that all users related to this repository will be deleted.
|
●
|
The length of time it takes to delete a File Repository depends on the number of users defined in the system. |
|
●
|
In the Users page, operators can select users sourced by a specific File Repository. |
|
●
|
Multiple File Repositories are supported and can be synchronized with the ARM separately. |
|
●
|
Each File Repository can have different fields, different mapping to the ARM users dictionary and delimiters. The ARM handles each File Repository separately (the same way as different LDAP servers). |
The File Repositories page displays the following information for each File Repository:
|
◆
|
‘Active’ (when all valid users are already accepted by the ARM, have became a part of the ARM users database and their information can be used for routing). |
|
◆
|
‘Synchronizing’ (the ARM is processing the file, that is, still reading from the file and adding valid users from the file). |
|
◆
|
‘Error’ (in the case that something is wrong with the file and the ARM fails to read its contents) |
|
●
|
Name. Name given to file repository during add/edit |
|
●
|
Number of users. The total number of users added from the Repository File. |
|
◆
|
If you delete a user related to the Repository File with a script using REST, the number will be updated to reflect the deletion. |
|
◆
|
If you delete a user of the File Repository from the GUI, the number will be updated to reflect the deletion. |
|
●
|
Description. Essential information to help the operator successfully manage the File Repository. For example, it will reflect the number of users who were successfully added or the reason of failure if they weren’t successfully added (such as duplication). This information refers to the last update only. |
|
●
|
Last Update. The time of the last update for a specific repository. View the column in the File Repository page. |
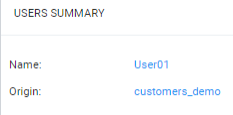
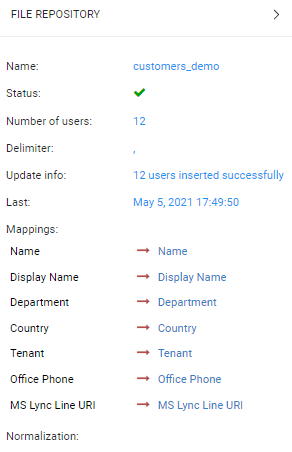
When a File Repository is selected in the File Repository page, the basic information summary for this repository is displayed on the right side of the page:
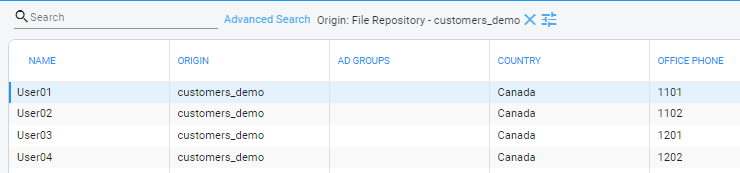
In the Users page (Users > Users), you can filter users sourced from a specific File Repository (in same way as with the LDAP). Click Advanced Search. and from the 'Origin' drop-down, navigate to and select the File Repository to filter by.
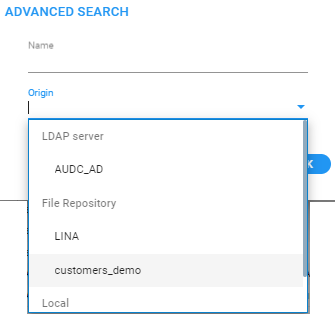
The indication of a specific File Repository as the source of the user information is displayed in the User's page in the 'Origin' column and in the Users Summary pane: